What you Need:
1. Race Ramps
2. Jack Stands x2
3. Drain Pan
4. Fluid Pump, make sure it fits quart size bottles
5. Jack *I HIGHLY recommend using a floor jack, not a cylinder jack like the one pictured. More on that later...
6. 21 mm socket
7. Torque wrench
8. 2.06 quarts of GL4-type manual transmission fluid. I recommend either Redline MT-90 or Ford Motorcraft Full Synthetic Manual Transmission Fluid. See end for more details.
9. Shop towels for cleaning up any spills
Step 1: Put Car on Race Ramps
Step 1 Details: I had to back my car on to the ramps because they wouldn't clear the front lip on the R3 bumper. I would recommend putting the front tires on the ramps if you have lower angle ramps. Its good to have a friend to guide you when you are doing this. Otherwise be very careful, you don't want your baby falling off the ramps!
Step 2: Put Other End on Jackstands
Step 2 Details: It's criticial for the car to be level when lifted or the transmission won't drain properly. Here's where its good to have a quality floor jack. The OEM jack does not go as high as the race ramps I have. So I had to use the cylinder jack from my Jeep. The problem is a cylinder jack is too tall to go under the car. I had to improvise and use the OEM jack to get the car high enough and then lift it the rest of the way with the cylinder jack to get it up on the jackstands.
The location of the cylinder jack in this pic is the factory recommended jacking point and where you should lift with your floor jack. You can lift the whole front end at once from this point. The jack stand locations I chose are a suspension mounting point and seemed to be the most reinforced spot.
*NOTE: Crawling under a lifted car is VERY dangerous. Before you go under, shake the car from several different angles to make sure its secure. Also for added safety you may want to take a wheel off and put it under the car as close as possible to where you will be working.
Step 3: Remove Fill Plug
Step 3 Details: Use the 21mm socket to remove #1. ALWAYS remove the fill plug first. If for whatever reason you aren't able to remove the fill plug you want to learn that before you've drained all the fluid out.
Step 4: Remove Drain Plug and Drain Old Fluid
Step 4 Details: Now use the 21mm socket to remove the drain plug (#2 in previous pic) and allow the fluid to completely drain.
Step 5: Clean Drain Plug and Crush Washer
Step 5 Details: The drain plug (#1) is magnetic and will collect all the metal chips that are floating around your tranny. This is why some people recommend to do this during the first 5000 miles because a lot of this accumlates as the transmission is broken in. #2 is the crush washer that goes on the drain plug, DONT lose this!
Clean all of that off while you are waiting for the old fluid to drain.
Clean all of that off while you are waiting for the old fluid to drain.
Step 6: Replace Drain Plug
After the old fluid has completely drained, use the torque wrench and 21mm socket to replace the drain plug. The torque spec is below:
Drain Plug Torque:
25-39 Nm / 29-37.5 lbf
Note: It's wise to invest in a quality torque wrench. I used a cheapo from Harbor Freight and the clicking indication was hardly noticable. I badly overtorqued my drain plug and deformed the crush washer. It isn't leaking but I will have to replace the washer next time I do this.
Step 7: Attach Pump to New Fluid
Step 7 Details: Pretty self explanatory. Make sure you use the extension that will reach to the bottom of the bottle so you can get every last drop of that expensive stuff out of there. Poor Man's Tip: When you switch to the second bottle, dump any remains of the first bottle into the second.
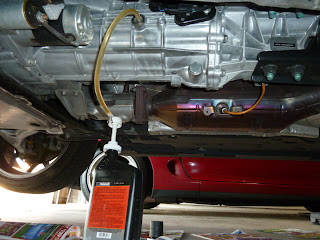
Step 8: Add New Fluid
Step 8 Details: Insert the hose into the fill plug and pump away. Capacity from the manual is 2.06 quarts, but there will likely be some old fluid left and 2 quarts should get you to full. You'll know its full when you put your finger in the fill plug and your finger touches the fluid. Or just do what I did and keep adding until it starts pouring out the fill plug.
Step 9: Replace Fill Plug
Step 9 Details: Now replace the fill plug (#1). Torque spec is below:
Fill Plug Torque:
39-59 Nm / 29-42 lbf
Fill Plug Torque:
39-59 Nm / 29-42 lbf


.jpg)


No comments:
Post a Comment